Creating a MPI cluster in Microsoft Azure Cloud
This post is on creating a MPI cluster, especially for training and deploying deep learning based model. I will be using Ubuntu 16.04 as my default operating system to create a cluster and my cloud infrastructure is Microsoft Azure (very similar for other cloud infrastructures such as Google and AWS).
Following steps are required to create MPI cluster, and MPI is purely C/C++ based implementation.
Defining the Master/s and Client/s Machine (Engine)
Based on your need Master can be only one machine and only one Client or One Master and multiple client or multiple Master and multiple Client. Make sure to choose the one that has the GPU, because while running the command we assume the numbers of worker resource in parameter as GPU but not CPU. Once you create your VM through Azure portal, and you can see the list of your VM.

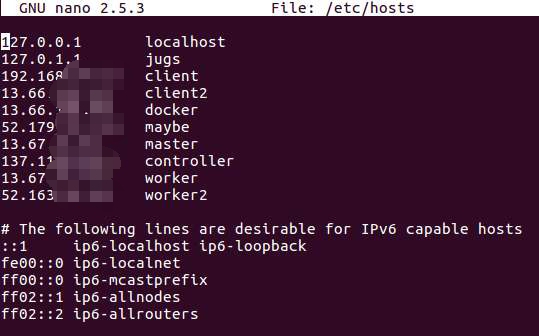
And, forgot to mention, to have one same user name common for all VM’s, there is a reason for this, which I’ll talk later. I encounter this while accessing the data over NFS. By Now, I’ll assume that we have a list of VM and we are ready to assign the name as masters and workers. Under the terminal of all of your VM’s make sure to assign the same name, so that we have same pattern.

setup ssh server and rsa/dsa key on client and the master
Setting up the SSH server and RSA/DAS key is something that almost everyone knows about. Your machine will be communicating through SSH over the network and data will be shared through NFS.
$ sudo apt-get install openssh-server
At this point, having SSH will enable you to connect to other machine through post 22 (can be alter manually for security purpose). Let’s generate the RSA/DAS key (RSA is considered more secure than DAS). But for now, it really doesn’t matter to us.
$ ssh-keygen -t dsa
Since, we generate the key on all our machines. Now, its time to copy the key to all other machines.
$ ssh-copy-id client # or any assigned name in /etc/hosts or even public ip
We need to enable passwordless SSH, because its a must for ssh communication under MPI.
$ eval 'ssh-agent'
 $ ssh-add ~/.ssh/id_dsa
By now, id_dsa or id_rsa are added to the client and master. Let’s try hitting this command, to check if we can ssh on to other VM’s.
$ ssh client
I guess you were able to. If not, check this tutorial from Digital Ocean
Setting up the NFS Server
For the shake for sharing the the directory we need to create common directory. During the training process, MPI uses ring algorithm to do all-reduce during computation stage. Therefore, we create a shared directory and mount that directory. I’ll just write the command line to mount the directory, its a simple mount for linux user.
Install the NFS (network file service) in host machine
$ sudo apt-get install install nfs-kernel-server
Now create a shared directory (can be named anything you like)
$ sudo mkdir share_dir # create a shared directory named share_dir
Export the shared directory
Edit the file name exports in /etc
$ sudo nano /etc/exports
and paste this line
/home/username/share_dir *(rw,sync,no_root_squash,no_subtree_check)
Make sure to put the username that you have and name of shared directory, other parameters are attributes (access rights) of directory.
exportfs-a is to export the file system.
Now, let’s just restart the nfs server service
sudo service nfs-kernel-server restart
The above procedure is for the server, now let’s mount that shared directory on evey client.
Let’s install the nfs client on worker machine.
$ sudo apt-get install nfs-common
Create a directory to mount the host’s shared directory on a worker machine.
mkdir share_dir
Now, let’s just mount
sudo mount -t nfs master:/home/username/share_dir ~/share_dir
We are almost done, see if you and list the mount dir in worker
df -h
Check this link for setting up NFS
By now, setting up is all done. It’s time to run our MPI.
Summary,

mpirun -np 4 --hosts master, client python deepspeech.sh
In next topic, I’ll go through installing the MPI (open MPI)

